

This is a bit of a tutorial on Displacement Maps - and yes, we've been here before. The reason I'm revisiting the subject is because I have just posted the first of the free workshops (the ones that go with my new Long Diaries book) on www.d4daisy.com.
I've used this feature of Image software in the lesson and wanted to explain it further. Hopefully you will find this useful even if you don't have the book.
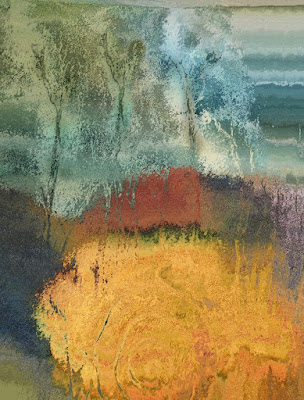
The lesson is based on a new piece of work in my myths and magic series and it was part of an experiment in perspective.
A detail of the piece is shown on the right and the trees are a printout of a computer design effect called a Displacement Maps. I've shown the technique in Paint Shop Pro and Photoshop Elements.
Paint Shop Pro
 Open the image you wish to displace. Mine is a photo of a piece of silk, stencilled using the pressure stencil technique. This is where you paint fabric with wet paints - silk paints or Adirondacks or similar. The fabric needs to be saturated. Then you just place a mylar (or similar plastic) stencil on top and leave it to dry. All kinds of interesting things happen.
Over the top of this fabric I have laid a piece of kozo paper, which represents a maze and will eventually form the lower half of my new piece. Then I took a photograph and saved it in PSP. Let's call it Photo1. See right.

I am going to displace this image with another pressure stencil - one that turned out rather pale so I highlighted the trees with a pen. This was also photographed and saved in PSP. Photo 2. See right.

With photo 1 and photo 2 open in the program (on the desktop) make sure you click on photo 1 as the active image.
Then go to the Effects menu, slide down to Distortion Effects and click on Displacement Map.
 On the sub menu that appears, you will see a little box with a pic in it. The words above read Displacement Map and you will see a little arrow next to it. Click on it and select Photo2 as the map - see right.
Make sure that the Intensity is set to 100 and that 'Stretch Map to Fit Image' is selected. You can play with all the other settings at a later date.
The two boxes highlighted by the arrow will show you the effect of the map in the box on the right and also in your image.
When you click OK, the map will take effect and your image will look something like the one below left. I printed it and placed my paper on Stitch and Tear before machine embroidering the trees (see below right).

Photoshop Elements
It's a little different with Elements as you have to save Photo 2 as a .PSD file. This is the native Elements file format. Make sure you know where it is saved.
Go to the filters menu (on the top bar) and select Distort and then Displace.

You will be asked to choose a file as a displacement map. Open Photo 2.

You'll then see another box - like the one below. Try these settings which should produce a very similar effect to the PSP one. You can't check the image before applying the filter in Elements.

Do hope you've enjoyed this. If you'd like to buy the book and gain access to the free classes go to www.d4daisy.com.
6 comments:
I enjoyed this Maggie. I love Displacement maps but find it's much easier using PSP. MInd you, I've probably forgotten how and things could have changed in elements since I last tried. I remember your first tutorial on Displacement Maps in the CTDG magazine and you used the word 'Joy'. That set me off on a very happy journey.
kobe basketball shoes
moncler
curry shoes
goyard handbags
bape
nike dunks
jordans
jordan shoes
jordan shoes
supreme outlet
Thanks for sharing your best thoughts. I've got really inspired to read your article. If people want to know about the stretch of an image in photoshop then don’t miss the chance to visit our website Stretch an Image in Photoshop .
Thank you for such a great post you wrote here and I'm very obliged to write an article here on the benefit of herbal herbs.I am 29 years old and have been diagnosed with breast cancer, ease of treatment and a similar story, except for my first acceptance as a rejection of herbal medicine. I was not part of the Perseid movement and did not really build relationships with any of them, I just believed in their operation. I say this because it was during the use of Dr. Itua herbal medicine that I now attest that herbal medicine is real, the phytotherapy Dr. Itua heals my breast cancer which I suffered for 2 years. Dr. Itua herbal medicine is made of natural herbs, with no side effects, and easy to drink. If you have the same breast cancer or any type of human illness, including HIV / AIDS, herpes cancer, bladder cancer, bladder cancer, prostate cancer, kidney cancer, lung cancer, skin cancer, skin cancer and skin cancer. , LEUKEMIA, VIRUSES, HEPATITIS, INFERTILITY WOMEN / MAN, LOT OF LOVE, LOTTERY. ITS CONTACT EMAIL / WHATSAPP: Or drituaherbalcenter@gmail.com/ +2348149277967
nice post embroidery digitizing service in us !
ruhg832gv
golden goose outlet
golden goose outlet
golden goose outlet
golden goose outlet
golden goose outlet
golden goose outlet
golden goose outlet
golden goose outlet
golden goose outlet
supreme outlet
Post a Comment