
Here we go:
Open the Image you want to use. Then open two or three others to use as maps. The best ones will have good areas of contrast and not too much texture. Not every image will work so give yourself lots of choice. Every image you open will show as a possible map.
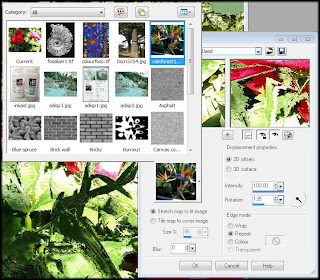
Look on the Menu bar for Effects, then Distortion Effects, then Displacement Maps. You will get a menu like this one.

Make sure that the settings show the following. Stretch map to fit, 2D Offsets, Blur is set to 0 and 100% Intensity. Other options can give good results but these are best to start with. The thumbnail shown under Displacement maps will be the image you want to displace. Click the arrow at the side of the thumbnail and you will see all the maps, including your own images. Click on the map you want. If you have the eyeball icon clicked, you can see the result on your image. I always use the locked eyeball, too.
This is my original image - a Canadian Landscape.

This was displaced by this photo of bird of paradise flowers.

Here’s the result using the settings shown in the box above. Note that the colours of the landscape remain but the shapes are those of the plants.

Lets try the same map - the birdy flowers - on a pic shown below, some peonies currently blooming in my garden.

Here's the result, using the same settings as before.

Now try changing the rotation. Either type a value in the box or drag the ‘clock hand’ around. Check the results.
Then try changing the edge modes - Wrap. Repeat and Colour. Change the colour and note the difference. Black or white add drama.
Now change 'Stretch to Fit' to 'Tile' and put a value in the box below. Try a low one to make small tiles, as shown below.

Hmmm. Not too interesting - although it might be with a different image. Giving it a big value makes it bigger than the original, like so.

I like this image. Always work on into your images with further effects - the above image with ploar Co-ordinates used (in the same Distortions menu).

Finally, the above image had the more interesting half selected using the rectangle tool. I then pasted the selection on a new page, pasted it again and mirrored the image. A little tidy-up with the eraser and here's a bowl of roses!
Let me know if this has helped.

4 comments:
Hi Maggie,
Great tutorial on displcements, all my previous attempt have failed but not today i have created some very interesting effects.
Many Thanks,
gilby
Maggie you are brilliant I managed it and it is magical I dont think my husband is going to see much more of me as it is so fascinating I am glued to the computor. Many thanks for being so generous with your time and knowledge
Maggie, am I correct in thinking I don't have displacement map in PSP version 8? I'll have to look for an upgrade. Thank you for the tutorial. I'm sure I'll be coming back to it again. The CD has been extremely useful as well.
Carole
Sheffield
Thanks Maggie. That was a really useful tutorial. I've had great fun playing. Of couse it'll give a new meaning to the phrase displacement activity.
Post a Comment